
First published February 2009
A detailed, practical example of how to achieve good humidity control in the greenhouse while using the minimum amount of energy.
Quick links:
- A balanced humidity control strategy
- The results from our first set of climate control settings
- How to achieve even better results
A balanced humidity control strategy
A detailed example of an initial humidity control strategy used within a greenhouse at Millbeck Nursery on a typical day in November. We look at the critical points in time throughout the day and the resulting temperatures and relative humidity, together with the setpoints used and the refinements that could improve the results even further.
The results from our first set of climate control settings
A close look at temperatures and relative humidity resulting from our initial strategy.
Figure 1 shows a graph of the greenhouse environment at Millbeck Nursery on a typical day in November 2008. These results were obtained after we implemented our climate control settings that were designed to achieve good humidity control with minimum energy use.
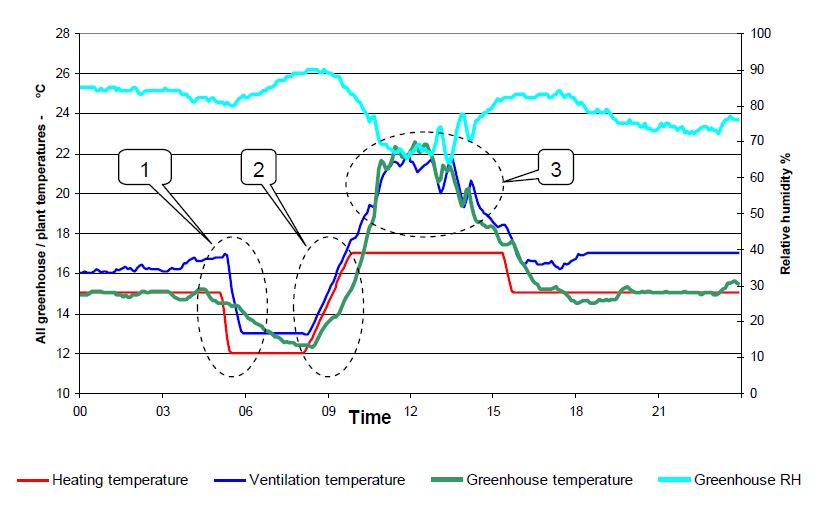
The graph shows three key times which were critical when we developed our strategy.
Area 1, 5:00 am – to implement ‘Drop’ we needed to achieve the minimum temperature by sunrise. To do this in an energy efficient way we wanted the greenhouse temperature to fall naturally; rather than opening the vents at the last moment after we had heated the greenhouse all night. To do this we reduced the heating temperature before the ventilation temperature.
Area 2, 8:00 am – here we needed to control the rate of temperature rise to avoid potential condensation problems. To do this we set the ventilation temperature 1oC above the heating temperature. These settings were used even when the humidity in the greenhouse was good.
Area 3, 10:00 am – once the plants had warmed up and the condensation risk was low we wanted to trap as much ‘free heat’ from solar gain as we could; but only if the humidity was acceptable. To do this we used a humidity influence on the ventilation temperature. This meant that the vents only opened when humidity conditions were unacceptable.
Figure 2 shows a summary of our initial climate control setpoints.
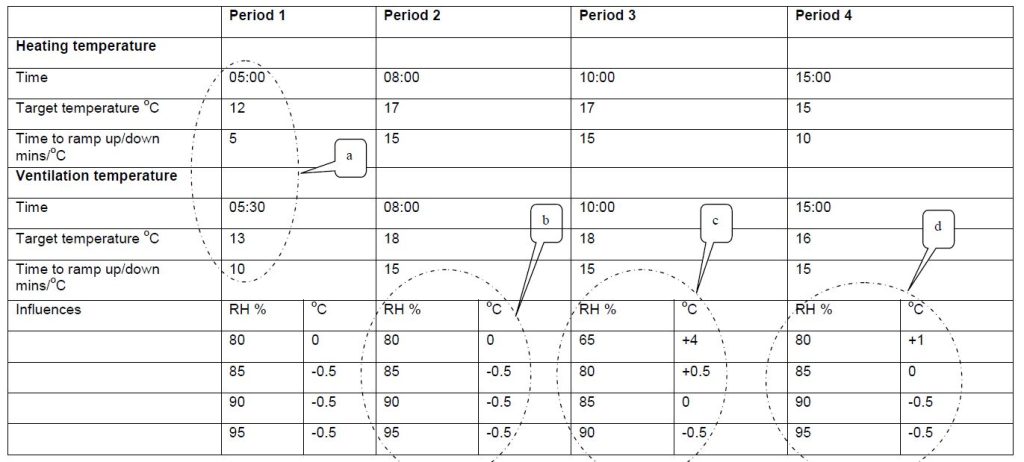
Key points to remember:
a – The reduction in ventilation temperature starts later than the reduction in heating temperature
b – Accurate temperature control and low humidity is required in the warm up period so the difference between the heating and ventilation set-points is small
c – Reduce ventilation to a minimum once the plant has had time to warm up and when the humidity is good
d – Increase the ventilation temperature to avoid unnecessary venting when the humidity is good
No humidity related minimum pipe or minimum vent set points were used.
How to achieve even better results
Two minor changes to the settings could mean even better results.
Our initial strategy has worked reasonably well, but some minor changes, shown in Figure 2, could make things even better.
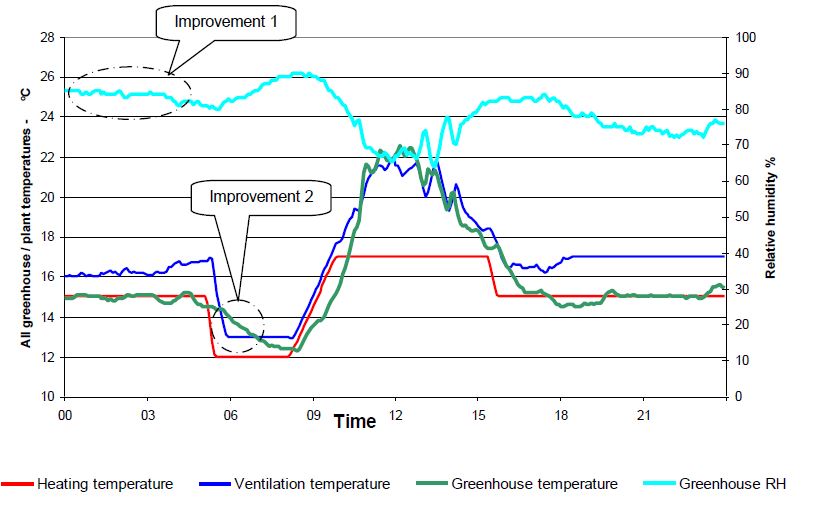
Improvement 1 – whilst the humidity overnight was reasonable, there were times when things were a bit too close for comfort. Whilst we had avoided the use of minimum pipe settings to save energy this result suggested that some pipe heat might be needed at the critical times. To do this the following minimum pipe settings have been introduced.
| RH % | RH % Minimum pipe temperature oC |
| 75 | 25 |
| 85 | 35 |
| 90 | 40 |
| 95 | 40 |
Improvement 2 – because the greenhouse temperature (green) line goes above the ventilation temperature (blue) line it shows that some venting was needed to achieve the target ‘Drop’ temperature. We therefore need to start the reduction in heating earlier.
Related Content


